


搜索到18篇与Typechos,技术展示的结果
 Typecho开发主题常用函数及调用方法 有很多人想开发typecho模板或者是修改美化主题时,发现函数找不到,或者是出错但是又不会,所以接下来统计分享一下这些函数。函数代码1、站点名称<?php $this->options->title() ?>2、站点网址<?php $this->options ->siteUrl(); ?>3、完整路径标题如分享几个 Typecho 中常用的调用函数<?php $this->archiveTitle(' » ', < span class="string">'', ' | '); ?><?php $this ->options->title(); ?>4、站点说明<?php $this->options->description() ?>5、模板文件夹地址<?php $this->options->themeUrl(); ?>6、导入模板文件夹内的 php 文件<?php $this->need('.php'); ?>7、文章或者页面的作者<?php $this->author(); ?>8、作者头像< ?php $this->author->gravatar('40') ?> //此处输出的完整的img标签,40是头像的宽和高9、该文作者全部文章列表链接<?php $this->author->permalink (); ?>10、该文作者个人主页链接<?php $this->author->url(); ?>11 、该文作者的邮箱地址<?php $this->author->mail(); ?>12、上一篇与下一篇调用代码<?php $this->thePrev(); ?> <?php $this->theNext(); ?>13、判断是否为首页,输出相关内容<?php if ($this->is('index')): ?> //首页输出内容 <?php else: ?> //不是首页输出内容 <?php endif; ?>14、文章或页面,评论数目<?php $this->commentsNum('No Comments', '1 Comment' , '%d Comments'); ?>15、截取部份文章(首页每篇文章显示摘要),350 是字数<?php $this->excerpt(350, '...'); ?>16、调用自定义字段<?php $this->fields->fieldName ?>17、RSS 地址<?php $this->options->feedUrl(); ?>18、获取最新 post<?php $this->widget('Widget_Contents_Post_Recent', 'pageSize=8&type=category')->parse('<li><a href="{permalink}">{title}</a></li>'); ?>19、纯文字分类名称,不带链接<?php $this->category(',', false); ?>20、获取当前文章所属分类(包含链接)<?php if ($this->is('post')): ?> <span><?php $this->category(' '); ?></span> <?php endif; ?>21、获取文章分类列表<ul> <?php $this->widget('Widget_Metas_Category_List') ->parse('<li><a href="{permalink}">{name}</a> ({count})</li>'); ?> </ul>22、获取某分类 post<ul> <?php $this->widget('Widget_Archive@indexyc', 'pageSize=8&type=category', 'mid=1') ->parse('<li><a href="{permalink}" title="{title}">{title}</a></li>'); ?> </ul>23、获取最新评论列表<ul> <?php $this->widget('Widget_Comments_Recent')->to($comments); ?> <?php while($comments->next()): ?> <li><a href="<?php $comments->permalink(); ?>"><?php $comments->author(false); ?></a>: <?php $comments->excerpt(50, '...'); ?></li> <?php endwhile; ?> </ul>24、首页获取 最新文章 代码限制条数<?php while ($this->next()): ?> <?php if ($this->sequence <= 3): ?> html <?php endif; ?> <?php endwhile; ?>25、获取最新评论列表第二个版本,只显示访客评论不显示博主也就是作者或者说自己发的评论<?php $this->widget('Widget_Comments_Recent','ignoreAuthor=true')->to($comments); ?> <?php while($comments->next()): ?> <li><a href="<?php $comments->permalink(); ?>"><?php $comments->author(false); ?></a>: <?php $comments->excerpt(50, '...'); ?></li> <?php endwhile; ?>26、获取文章时间归档<ul> <?php $this->widget('Widget_Contents_Post_Date', 'type=month&format=F Y') ->parse('<li><a href="{permalink}">{date}</a></li>'); ?> </ul>27、获取标签集合,也就是标签云<?php $this->widget('Widget_Metas_Tag_Cloud', 'ignoreZeroCount=1&limit=28')->to($tags); ?> <?php while($tags->next()): ?> <a href="<?php $tags->permalink(); ?>" class="size-<?php $tags->split(5, 10, 20, 30); ?>"><?php $tags->name(); ?></a> <?php endwhile; ?>28、调用该文相关文章列表<?php $this->related(5)->to($relatedPosts); ?> <?php if ($relatedPosts->have()): ?> //这句也可以写成 if (count($relatedPosts->stack)) <ul><?php while ($relatedPosts->next()): ?> <li><a href="<?php $relatedPosts->permalink(); ?>" title="<?php $relatedPosts->title(); ?>"><?php $relatedPosts->title(); ?></a></li> <?php endwhile; ?></ul> <?php else : ?> <li>无相关文章</li> <?php endif; ?>29、隐藏 head 区域的程序版本和模版名称<?php $this->header("generator=&template="); ?>30、获取读者墙<?php $period = time() - 999592000; // 時段: 30 天, 單位: 秒 $counts = Typecho_Db::get()->fetchAll(Typecho_Db::get() ->select('COUNT(author) AS cnt','author', 'url', 'mail') ->from('table.comments') ->where('created > ?', $period ) ->where('status = ?', 'approved') ->where('type = ?', 'comment') ->where('authorId = ?', '0') ->group('author') ->order('cnt', Typecho_Db::SORT_DESC) ->limit(25) ); $mostactive = ''; $avatar_path = 'http://www.gravatar.com/avatar/'; foreach ($counts as $count) { $avatar = $avatar_path . md5(strtolower($count['mail'])) . '.jpg'; $c_url = $count['url']; if ( !$c_url ) $c_url = Helper::options()->siteUrl; $mostactive .= "<a href='" . $c_url . "' title='" . $count['author'] . " (参与" . $count['cnt'] . "次互动)' target='_blank'><img src='" . $avatar . "' alt='" . $count['author'] . "的头像' class='avatar' width='32' height='32' /></a>\n"; } echo $mostactive; ?>31、登陆与未登录用户展示不同内容<?php if($this->user->hasLogin()): ?> // 登陆可见 <?php else: ?> // 未登录和登陆均可见 <?php endif; ?>32、导航页面列表调用隐藏特定的页面 这个演示隐藏了 album 和 search 两个页面<ul> <li<?php if($this->is('index')): ?> class="current"<?php endif; ?>><a href="<?php $this->options->siteUrl(); ?>">主页</a></li> <?php $this->widget('Widget_Contents_Page_List')->to($pages); ?> <?php while($pages->next()): ?> <?php if (($pages->slug != 'album') && ($pages->slug != 'search')): ?> <li<?php if($this->is('page', $pages->slug)): ?> class="current"<?php endif; ?>><a href="<?php $pages->permalink(); ?>" title="<?php $pages->title(); ?>"><?php $pages->title(); ?></a></li> <?php endif; ?> <?php endwhile; ?> </ul> //参数说明:9.0 版 typecho 支出在后台管理页面编辑时选择隐藏页面。33、Typecho 归档页面 (牧风提供)<?php $this->widget('Widget_Contents_Post_Recent', 'pageSize=10000')->to($archives); $year=0; $mon=0; $i=0; $j=0; $output = '<div id="archives">'; while($archives->next()): $year_tmp = date('Y',$archives->created); $mon_tmp = date('m',$archives->created); $y=$year; $m=$mon; if ($mon != $mon_tmp && $mon > 0) $output .= '</ul></li>'; if ($year != $year_tmp && $year > 0) $output .= '</ul>'; if ($year != $year_tmp) { $year = $year_tmp; $output .= '<h3 class="al_year">'. $year .' 年</h3><ul class="al_mon_list">'; //输出年份 } if ($mon != $mon_tmp) { $mon = $mon_tmp; $output .= '<li><span class="al_mon">'. $mon .' 月</span><ul class="al_post_list">'; //输出月份 } $output .= '<li>'.date('d日: ',$archives->created).'<a href="'.$archives->permalink .'">'. $archives->title .'</a> <em>('. $archives->commentsNum.')</em></li>'; //输出文章日期和标题 endwhile; $output .= '</ul></li></ul></div>'; echo $output; ?>34、获取当前文章页缩略图<?php $this->attachments(1)->attachment->url(); ?> //进行熊掌号改造的朋友请务必注意,这里所谓缩略图指的是当前文章页第一个附件地址,请确保第一个附件类型为图片。35、根据页面类型显示内容//判断是文章页则显示内容 <?php if ($this->is('post')): ?> 想要显示的内容1 <?php endif; ?> //判断是页面则显示内容 <?php if ($this->is('page', 'about')): ?> 想要显示的内容2 <?php endif; ?>注:若有函数错误情况,请反馈
- 【原创】安全认证角标 {card-default label="效果展示" width="100%"}{/card-default}代码展示网站安全 查询去 https://myssl.com/ ;如下源代码域名改成你的就可以了{tabs}{tabs-pane label="本站代码"}<div id="cc-myssl-id" style="position: fixed;right: 0;bottom: 0;width: 65px;height: 65px;z-index: 99;"> <a href="https://myssl.com/blog.ococn.cn?domain=blog.ococn.cn&status=q"><img src="https://static.myssl.com/res/images/myssl-id.png" alt="" style="width:100%;height:100%"></a>{/tabs-pane}{tabs-pane label="源代码"}<div id="cc-myssl-id" style="position: fixed;right: 0;bottom: 0;width: 65px;height: 65px;z-index: 99;"> <a href="https://myssl.com/域名?domain=域名&status=q"><img src="https://static.myssl.com/res/images/myssl-id.png" alt="" style="width:100%;height:100%"></a>{/tabs-pane}{/tabs}总结也就是你的网站SSL证书和网站引用的链接是否安全的是绿色A+那么你的网站SSL证书和引用网站都安装了SSL证书都很安全你的网站SSL证书了;但你网站所引用的没有证书就达不到标准
- 博客的侧栏增加社交信息 前言:这个模块适合任何主题及程序,只需要根据自己的主题或者程序进行改进就行我这里演示的是我正在使用的Joe主题,是一款轻量、开源的主题截图展示{tabs}{tabs-pane label="PC"}{/tabs-pane}{tabs-pane label="PE"}{/tabs-pane}{/tabs}教程一、添加PC端代码 打开 Joe/public/aside.php 文件,然后在想要增加的位置添加以下代码{tabs}{tabs-pane label="代码"}隐藏内容,请前往内页查看详情{/tabs-pane}{tabs-pane label="位置"}{/tabs-pane}{/tabs} 二、添加PE端代码 打开 Joe/public/header.php 文件,然后在想要增加的位置添加上面PC的代码{tabs}{tabs-pane label="代码"}隐藏内容,请前往内页查看详情{/tabs-pane}{tabs-pane label="位置"}{/tabs-pane}{/tabs}三、添加后台控制 其他模板直接在 functions.php 添加以下代码 Joe模板可以放在 Joe/public/custom.php 里面{tabs}{tabs-pane label="代码"}隐藏内容,请前往内页查看详情{/tabs-pane}{tabs-pane label="位置"}{/tabs-pane}{tabs-pane label="效果展示"}{/tabs-pane}{/tabs} 四、添加样式CSS 在 Joe/assets/css/joe.global.min.css 里添加以下样式.top-social { position: relative; padding: 5px 0; width: 250px; display: flex; flex-wrap: wrap; background: var(--background); justify-content: space-around; //每个项目两侧的间隔相等 margin-bottom: 15px; border-radius: var(--radius-wrap); box-shadow: var(--box-shadow); li { width: 50px; text-align: center; padding: 5px 0px; position: relative; img { height: 32px; } .WeChatInner { display: none; position: absolute; box-shadow: 0px 1px 4px 2px var(--theme); border-radius: var(--radius-wrap); transition: 0.7s all ease; background: var(--background); -webkit-transition: 0.7s all ease; top: -175px; left: -50px; transform: translate3d(0, 16px, 0); width: 150px; height: 150px; z-index: 2; &::before { content: ""; position: absolute; bottom: -16px; left: 0; right: 0; margin: auto; display: inline-block; width: 0px; border: 18px solid transparent; border-bottom: none; border-top-color: var(--background); filter: drop-shadow(0px 4px 2px var(--theme)); } img { border-radius: 2px; width: 140px; height: auto; margin: 5px; background: none; } } &:hover .WeChatInner { display: block; } } } .pe-social { width: 100%; }五、添加JS(重要) 可以直接在 Joe/assets/js/joe.global.min.js 最后添加 不会添加就直接引用我的js{tabs}{tabs-pane label="引用"}<script src="https://blog.ococn.cn/usr/themes/Joe/assets/js/custom.min.js"></script>{/tabs-pane}{tabs-pane label="源代码"}// 侧栏社交信息 if ($(".top-social li").hasClass("WeChat")) { $WeChatA = $(".WeChatA"); var html = $WeChatA.get(0).outerHTML; html = html.replace(/^<a/, "<div"); html = html.replace(/\/a>$/, "/div>"); $WeChatA.replaceWith(html); $(".WeChat").mouseenter(function () { $(".WeChat").append( '<div class="WeChatInner"><img src="javascript:;" /></div>' ); $(".WeChatInner img").attr("src", $(".WeChatA").attr("href")); }); $(".WeChat").mouseleave(function () { $(".WeChatInner").remove(); }); }{/tabs-pane}{/tabs}教程结束结语: 这里取了一个巧,给div设置了href属性,但是按照html规范这是不被提倡的 不过我这里为了获得弹出二维码的功能,把微信的a标签变成了div来达到微信图标不可点击的效果 一点拙劣的技巧,不建议做项目使用JS源文件
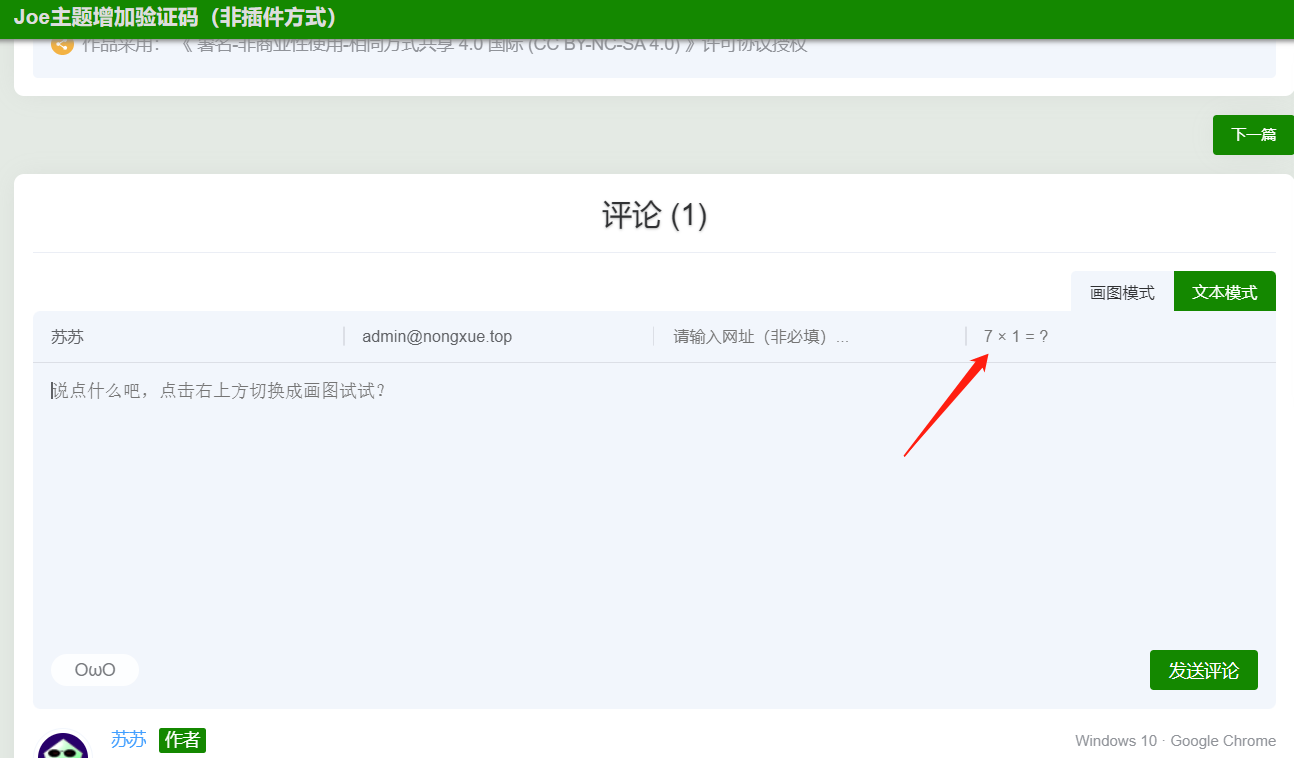
- 【转载】Joe主题评论增加验证码(非插件方式) 发现Joe本身不支持评论验证码,就查阅资料,修改部分Joe主题文件,增加评论验证码。当前版本Typecho:1.2.0Joe主题:7.3.6目标非插件方式,简单实现评论验证码,防止机器人灌水。涉及文件/Joe/core/function.php (必须)目的: 增加需要用到的函数增加如下3个函数#生成验证码 function comment_protection_code(){ $num1=rand(1,9); $num2=rand(1,9); $rand=rand(1,100)%3; switch($rand){ case 0: $ret=$num1 + $num2; $symbol='+'; break; case 1: $ret=$num1 - $num2; $symbol='-'; break; case 2: $ret=$num1 * $num2; $symbol='×'; break; } $_SESSION['verify']=$ret; $_SESSION['verify_md5']=md5($num1.$num2); echo "<input type=\"text\" autocomplete=\"off\" name=\"sum\" placeholder=\"$num1 $symbol $num2 = ?\" />"; echo "<input type=\"hidden\" name=\"num1\" value=\"$num1\">\n"; echo "<input type=\"hidden\" name=\"num2\" value=\"$num2\">"; } #验证 function comment_protection_do($comment, $post, $result){ if(md5($_SESSION['verify']) != md5($_POST['sum']) || $_SESSION['verify_md5'] != md5($_POST['num1'].$_POST['num2'])){ throw new Typecho_Widget_Exception(_t('对不起: 验证码错误,请重试。','评论失败'), 200); } return $comment; } #判断路由用到 function endsWith($haystack, $needle){ return $needle === '' || substr_compare($haystack, $needle, -strlen($needle)) === 0; }/Joe/core/core.php (必须)目的: 挂载验证函数搜索函数 themeInit ,将如下代码粘贴到函数内#仅在提交评论时生效 if(endsWith($self->request->getPathInfo(), '/comment')){ $comment = comment_protection_do($comment, $post, $result); }/Joe/public/comment.php (必须)目的: 增加验证码输入框搜索 输入网址 ,在它的下方增加一个兄弟节点,用来输入验证码... <div class="list"> <input type="text" autocomplete="off" name="url" placeholder="请输入网址(非必填)..." /> </div> #上方为原始代码 #下方为新增 <!-- 增加验证码输入框--> <div class="list"> <?php comment_protection_code();?> </div>/Joe/assets/js/joe.global.js (必须)目的: 在提交评论时,增加验证码校验参数打开未压缩版js文件,搜索 激活评论提交 ,用下方代码替换,然后压缩后替换同文件夹的joe.global.min.js /* 激活评论提交 已修改 */ { if ($('.joe_comment').length) { let isSubmit = false; $('.joe_comment__respond-form').on('submit', function (e) { e.preventDefault(); const action = $('.joe_comment__respond-form').attr('action') + '?time=' + +new Date(); const type = $('.joe_comment__respond-form').attr('data-type'); const parent = $('.joe_comment__respond-form').attr('data-coid'); const author = $(".joe_comment__respond-form .head input[name='author']").val(); const _ = $(".joe_comment__respond-form input[name='_']").val(); const mail = $(".joe_comment__respond-form .head input[name='mail']").val(); const url = $(".joe_comment__respond-form .head input[name='url']").val(); const sum = $(".joe_comment__respond-form .head input[name='sum']").val(); const num1 = $(".joe_comment__respond-form .head input[name='num1']").val(); const num2 = $(".joe_comment__respond-form .head input[name='num2']").val(); let text = $(".joe_comment__respond-form .body textarea[name='text']").val(); if (sum === '') return Qmsg.info('请输入验证信息!'); if (author.trim() === '') return Qmsg.info('请输入昵称!'); if (!/\w+([-+.]\w+)*@\w+([-.]\w+)*\.\w+([-.]\w+)*/.test(mail)) return Qmsg.info('请输入正确的邮箱!'); if (type === 'text' && text.trim() === '') return Qmsg.info('请输入评论内容!'); if (type === 'draw') { const txt = $('#joe_comment_draw')[0].toDataURL('image/webp', 0.1); text = '{!{' + txt + '}!} '; } if (isSubmit) return; isSubmit = true; $('.joe_comment__respond-form .foot .submit button').html('发送中...'); $.ajax({ url: action, type: 'POST', data: { author, mail, text, parent, url, num1, num2, sum, _ }, dataType: 'text', success(res) { let arr = [], str = ''; arr = $(res).contents(); Array.from(arr).forEach(_ =### { if (_.parentNode.className === 'container') str = _; }); if (!/Joe/.test(res)) { Qmsg.warning(str.textContent.trim() || ''); isSubmit = false; $('.joe_comment__respond-form .foot .submit button').html('发表评论'); } else { window.location.reload(); } }, error(res) { isSubmit = false; $('.joe_comment__respond-form .foot .submit button').html('发表评论'); Qmsg.warning('发送失败!请刷新重试!'); } }); }); } }自定义css(可选) 目的: 在输入框左侧增加竖形分割线,统一外观添加方式:后台->Joe主题设置->全局设置->自定义CSS,增加如下样式/*验证码处css*/ @media (min-width: 768px){.joe_comment__respond-form .head .list:nth-child(4){position:relative}.joe_comment__respond-form .head .list:nth-child(4)::before{content:'';position:absolute;top:50%;transform:translateY(-50%);width:1px;height:15px;background:var(--classA)}.joe_comment__respond-form .head .list:nth-child(4)::before{left:0}}截图展示{tabs}{tabs-pane label="验证码位置"}{/tabs-pane}{tabs-pane label="未输入提示"}{/tabs-pane}{tabs-pane label="输入错误提示"}{/tabs-pane}{/tabs}转载说明原文地址
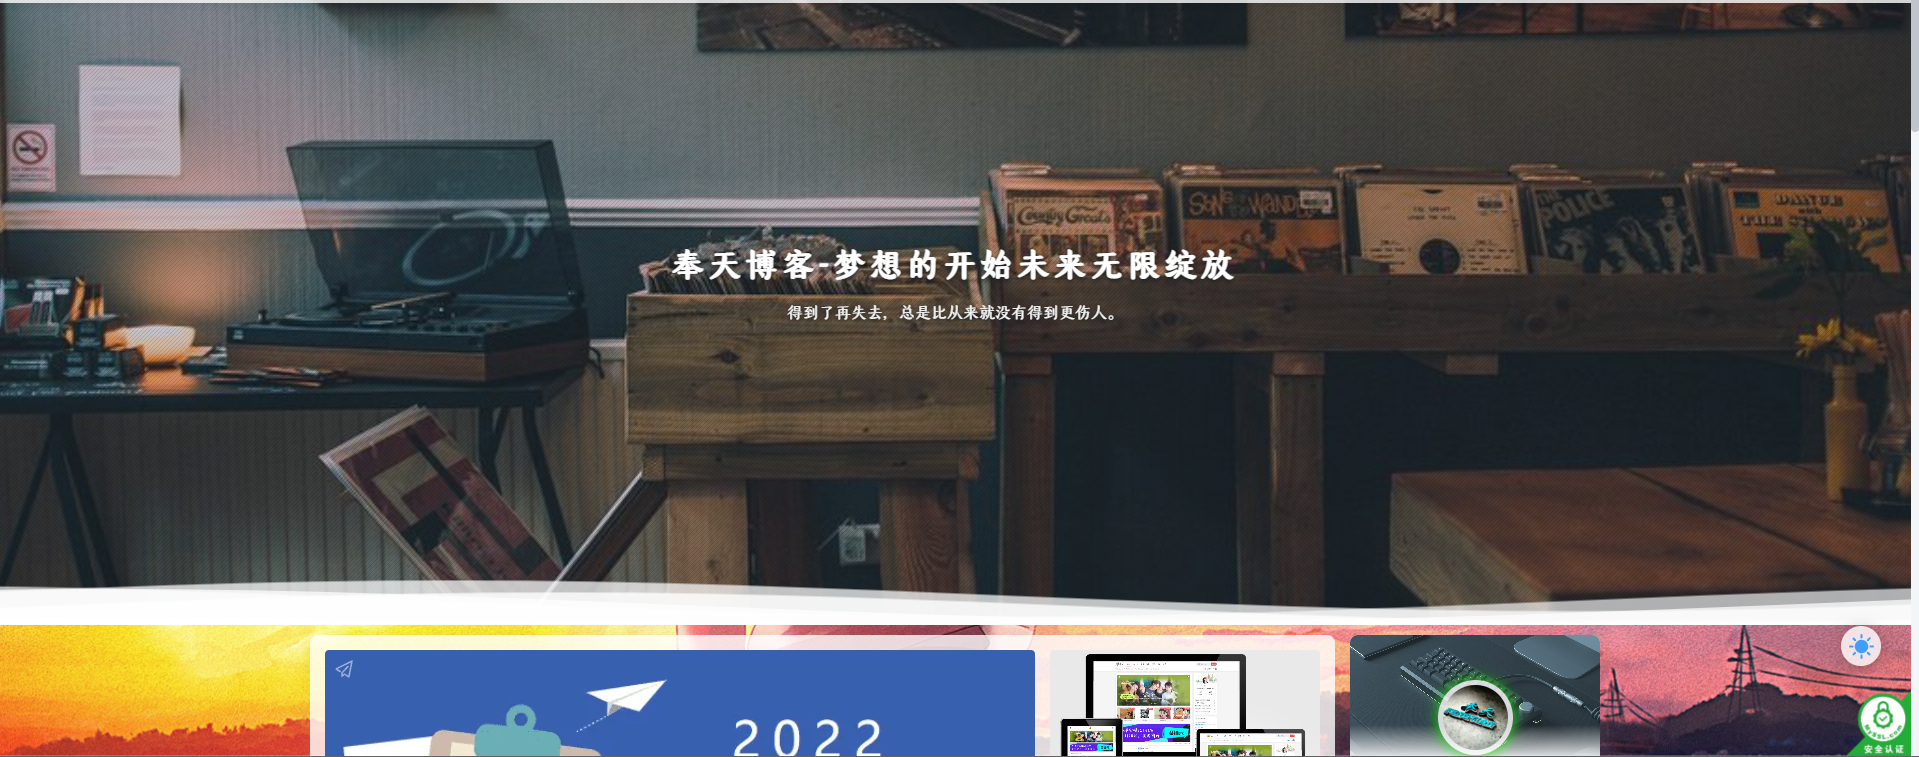
- Joe主题 给首页和文章页顶部加一个大图 截图展示{tabs}{tabs-pane label="首页"}{/tabs-pane}{tabs-pane label="文章页"}{/tabs-pane}{/tabs}第一步先加首页修改 index.php 文件,文件目录 Joe主题文件 /index.php 下面两个是我推荐的,放在图片地址里即可同步侧边栏博主背景壁纸代码: <?php $this->options->JAside_Author_Image() ?> 随机背景图API:https://api.ococn.cn/api/img (代码里的这个链接可以换成自己喜欢的){tabs}{tabs-pane label="代码"}<div class="HeaderImg" style="background: url(https://api.ococn.cn/api/img) center;background-size:cover;"> <div class="infomation"> <div class="title"><?php $this->options->title(); ?></div> <div class="desctitle"> <span class="motto joe_motto"</span> </div> </div> <section class="HeaderImg_bottom"> <svg class="waves-svg" xmlns="http://www.w3.org/2000/svg" xmlns:xlink="http://www.w3.org/1999/xlink" viewBox="0 24 150 28" preserveAspectRatio="none" shape-rendering="auto"> <defs> <path id="gentle-wave" d="M -160 44 c 30 0 58 -18 88 -18 s 58 18 88 18 s 58 -18 88 -18 s 58 18 88 18 v 44 h -352 Z"></path> </defs> <g class="parallax"> <use xlink:href="#gentle-wave" x="48" y="0"></use> <use xlink:href="#gentle-wave" x="48" y="3"></use> <use xlink:href="#gentle-wave" x="48" y="5"></use> <use xlink:href="#gentle-wave" x="48" y="7"></use> </g> </svg> </section> </div>{/tabs-pane}{tabs-pane label="代码位置"}{/tabs-pane}{/tabs}第二步下载CSS文件放入服务器,然后后台代码引入CSS隐藏内容,请前往内页查看详情{tabs}{tabs-pane label="代码"}<link rel="stylesheet" href="这里填写你CSS的直链地址">{/tabs-pane}{tabs-pane label="代码位置"}{/tabs-pane}{/tabs}第三步设置全局透明度,这个看个人需求,也可以忽略此步骤(不喜欢可以跳过){tabs}{tabs-pane label="代码"}body {--background: rgba(255,255,255,0.8);}{/tabs-pane}{tabs-pane label="代码位置"}{/tabs-pane}{/tabs}第四步再给文章页顶部加一个大图友情提示: 文章顶部图显示规则写成了与首页文章列表一样获取,会自动显示文章里的第一张图,文章无图的情况下会自动显示你后台设置的自定义缩略图,在后台图片设置选项添加,或者你也可以更换自己的api图库。自行更换图库方法:下面第一行代码中 <?php echo _getThumbnails($this)[0] ?>换成自己的图片地址即可使用方法修改 post.php 文件,文件目录 Joe主题文件 /post.php {tabs}{tabs-pane label="代码"}<div class="HeaderImg" style="background: url(<?php echo _getThumbnails($this)[0] ?>) center;background-size:cover;"> <div class="infomation"> <div class="title"><?php $this->title() ?></div> <div class="desctitle"> <div class="item"> <span class="text"><?php $this->date('Y-m-d'); ?></span> <span class="line">/</span> <span class="text"><?php $this->commentsNum('%d'); ?> 评论</span> <span class="line">/</span> <span class="text" id="Joe_Article_Views"><?php _getViews($this); ?> 阅读</span> <span class="line">/</span> <span class="text" id="Joe_Article_Views"><?php _getAgree($this) ?> 点赞</span> </div> </div> </div> <section class="HeaderImg_bottom"> <svg class="waves-svg" xmlns="http://www.w3.org/2000/svg" xmlns:xlink="http://www.w3.org/1999/xlink" viewBox="0 24 150 28" preserveAspectRatio="none" shape-rendering="auto"> <defs> <path id="gentle-wave" d="M -160 44 c 30 0 58 -18 88 -18 s 58 18 88 18 s 58 -18 88 -18 s 58 18 88 18 v 44 h -352 Z"></path> </defs> <g class="parallax"> <use xlink:href="#gentle-wave" x="48" y="0"></use> <use xlink:href="#gentle-wave" x="48" y="3"></use> <use xlink:href="#gentle-wave" x="48" y="5"></use> <use xlink:href="#gentle-wave" x="48" y="7"></use> </g> </svg> </section> </div>{/tabs-pane}{tabs-pane label="代码位置"}{/tabs-pane}{/tabs}